

久しぶりの投稿になる。
以前から興味のあったハニーポットについて,SSHのものがあると聞き,眠っていた Paspberry Pi3 Model B を用いて構築を行った。
使用したハニーポットは Cowrie と呼ばれるもので,Kippo を改良したものである。次の投稿「SSHハニーポットはKippoではなくCowrieを使え」 に書かれているように, Kippo は攻撃者に対策が取られているようだ。Kippo のコードを編集してこの問題を訂正する方法もあるみたいだが([技術|SEC] kippoで、echoを用いたハニーポット判定を防ぐ),既に改良されたもの(Cowrie)があるので,今回は Cowrie を使用していく。また,結果をグラフィカルに表してくれるツールとして,合わせて Kippo-Graph も導入する。
・Cowrieの導入(ほとんどGitHub – micheloosterhof/cowrieの手順通り)
■1. Cowrie用のユーザー追加
adduser cowrie
passwd cowrie
■2. 必要なパッケージ類のインストール
$ sudo apt-get install git python-virtualenv libmpfr-dev libssl-dev libmpc-dev libffi-dev build-essential libpython-dev python2.7-minimal authbind python-setuptools python-dev
$ sudo su - cowrie
$ git clone http://github.com/micheloosterhof/cowrie
$ cd cowrie
$ pwd
/home/cowrie/cowrie
$ virtualenv cowrie-env
$ source cowrie-env/bin/activate
(cowrie-env) $ pip install -r requirements.txt
■3. 設定ファイル
$ pwd
/home/cowrie/cowrie
$ cp cowrie.dfg.dist cowrie.cfg
$ vi cowrie.cfg <- 必要な設定を行ってください(そのままでも動作するそうです)
■4. 実行と終了
$ ./bin/cowrie start
$ ./bin/cowrie stop
Cowrieはデフォルトで2222番が待ち受けポートなので,次の設定により22番に来た通信を2222番にリダイレクトする。
■5. ポートリダイレクト
$ sudo iptables -t nat -A PREROUTING -p tcp --dport 22 -j REDIRECT --to-port 2222
以上の設定で,sshハニーポットCowrieが構築できる。ちなみに,Cowrie用のダミーユーザー情報は/home/cowrie/cowrie/data/userdb.txtに格納されている。
■vi /home/cowrie/cowrie/data/userdb.txt
root:x:!root
root:x:123456
root:x:password
このファイルに,ユーザー名:x:パスワードのように記述することで,ダミーユーザーを定義できる。(上の設定では,root/123456 , root/passwordの組み合わせでsshにログインできる)
・Kippo-Graphの導入
■1. MySqlのセットアップ
$ sudo apt-get install mysql-server libmysqlclient-dev

$ mysql_secure_installation

NOTE: RUNNING ALL PARTS OF THIS SCRIPT IS RECOMMENDED FOR ALL MySQL
      SERVERS IN PRODUCTION USE!  PLEASE READ EACH STEP CAREFULLY!

In order to log into MySQL to secure it, we'll need the current
password for the root user.  If you've just installed MySQL, and
you haven't set the root password yet, the password will be blank,
so you should just press enter here.

Enter current password for root (enter for none):
OK, successfully used password, moving on...

Setting the root password ensures that nobody can log into the MySQL
root user without the proper authorisation.

You already have a root password set, so you can safely answer 'n'.

Change the root password? [Y/n] n
 ... skipping.

By default, a MySQL installation has an anonymous user, allowing anyone
to log into MySQL without having to have a user account created for
them.  This is intended only for testing, and to make the installation
go a bit smoother.  You should remove them before moving into a
production environment.

Remove anonymous users? [Y/n] Y
 ... Success!

Normally, root should only be allowed to connect from 'localhost'.  This
ensures that someone cannot guess at the root password from the network.

Disallow root login remotely? [Y/n] Y
 ... Success!

By default, MySQL comes with a database named 'test' that anyone can
access.  This is also intended only for testing, and should be removed
before moving into a production environment.

Remove test database and access to it? [Y/n] Y
 - Dropping test database...
ERROR 1008 (HY000) at line 1: Can't drop database 'test'; database doesn't exist
 ... Failed!  Not critical, keep moving...
 - Removing privileges on test database...
 ... Success!

Reloading the privilege tables will ensure that all changes made so far
will take effect immediately.

Reload privilege tables now? [Y/n] Y
 ... Success!

Cleaning up...

All done!  If you've completed all of the above steps, your MySQL
installation should now be secure.

Thanks for using MySQL!

$ sudo vi /etc/mysql/my.cnf

[mysql]
default-character-set=utf8

$ sudo systemctl restart mysql
■2. Cowrie用のデータベースの作成
$ mysql -u root -p
Enter password:
mysql> create database cowrie;
mysql> grant all privileges on cowrie.* to cowrie@localhost identified by 'cowrie_password';
mysql> quit

$ cd /home/cowrie/cowrie
$ mysql -u cowrie -p
Enter password:
mysql> source doc/sql/mysql.sql
mysql> quit
■3. CowrieのログをMySqlに保存する設定
$ pwd
/home/cowrie/cowrie
$ vi cowrie.cfg
#[output_mysql]
#host = localhost
#database = cowrie
#username = cowrie
#password = secret
#port = 3306
   ↓
[output_mysql]
host = localhost
database = cowrie
username = cowrie
password = cowrie_password
port = 3306
■4. Apache2のインストールと設定
$ sudo apt-get install apache2
$ sudo nano /etc/apache2/conf-available/security.conf
ServerTokens Prod
ServerSignature Off

$ sudo vi /etc/apache2/conf-available/charset.conf
#AddDefaultCharset UTF-8

$ sudo apachectl configtest
$ sudo systemctl restart apache2
■5. Kippo-Graphのインストール(ver.1.5.1)
$ wget http://bruteforce.gr/wp-content/uploads/kippo-graph-1.5.1.tar.gz
$ sudo tar zxvf kippo-graph-1.5.1.tar.gz -C /usr/share
$ sudo vi /etc/apache2/conf-available/kippo-graph.conf
<IfModule mod_alias.c>
    Alias /kippo-graph /usr/share/kippo-graph-1.5.1
</IfModule>
$ sudo a2enconf kippo-graph
$ sudo apachectl configtest
$ sudo systemctl restart apache2
$ sudo chmod 777 /usr/share/kippo-graph-1.5.1/generated-graphs/
$ sudo cp -p /usr/share/kippo-graph-1.5.1/config.php.dist /usr/share/kippo-graph-1.5.1/config.php
$ sudo vi /usr/share/kippo-graph-1.5.1/config.php
define('DB_HOST', 'localhost');
define('DB_USER', 'cowrie');
define('DB_PASS', 'cowrie_password');
define('DB_NAME', 'cowrie');
define('DB_PORT', '3306');
Kippo-GraphはもともとKippoのために作成されたものなので,Cowrieでは動かない部分もあるので,その部分の修正を行う。
■6. Kippo-Graphの修正
$ cd /usr/share/kippo-graph-1.5.1
$ sudo cp -p class/KippoPlayLog.class.php class/KippoPlayLog.class.php.org
$ sudo vi class/KippoPlayLog.class.php
$ $ diff class/KippoPlayLog.class.php.org class/KippoPlayLog.class.php
21c21
< SELECT ttylog.session, timestamp, ROUND(LENGTH(ttylog)/1024, 2) AS size --- >             SELECT ttylog.session, timestamp, ROUND(size/1024, 2) AS sizediff class/KippoPlayLog.class.php.org class/KippoPlayLog.class.php
21c21
< SELECT ttylog.session, timestamp, ROUND(LENGTH(ttylog)/1024, 2) AS size --- >             SELECT ttylog.session, timestamp, ROUND(size/1024, 2) AS size
$ cd /usr/share/kippo-graph-1.5.1
$ sudo cp -p include/play.php include/play.php.org
$ sudo vi include/play.php
$ diff -u ./include/play.php.org ./include/play.php
--- ./include/play.php.org      2017-04-27 21:53:10.404195307 +0900
+++ ./include/play.php  2017-04-27 21:53:44.363874892 +0900
@@ -67,7 +67,7 @@
             $rows = R::getAll($db_query);

             foreach ($rows as $row) {
-                $log = base64_encode($row['ttylog']);
+                $log = base64_encode(file_get_contents($row['ttylog']));
             }

             $db_query = "SELECT ip, starttime FROM sessions WHERE id='$session'";

$ cd /usr/share/kippo-graph-1.5.1/include
$ sudo ln -s ${COWRIE_INSTALL_DIR}/log/ log
$ sudo chgrp www-data /home/cowrie/cowrie/log/tty/
$ sudo chmod g+s /home/cowrie/cowrie/log/tty/
■7. Cowrie起動スクリプトの修正
$ pwd
/home/cowrie/cowrie
$ cp -p start.sh start.sh.org
$ vi start.sh
$ diff -u start.sh.org start.sh
--- ./start.sh.org      2017-04-27 21:55:42.942756469 +0900
+++ ./start.sh  2017-04-27 21:56:47.512147707 +0900
@@ -37,7 +37,7 @@
 echo "Starting cowrie with extra arguments [$XARGS $DAEMONIZE] ..."
 if [ $AUTHBIND_ENABLED = "no" ]
 then
-    twistd $XARGS $DAEMONIZE -l log/cowrie.log --umask 0077 --pidfile ${PIDFILE} cowrie
+    twistd $XARGS $DAEMONIZE -l log/cowrie.log --umask 0027 --pidfile ${PIDFILE} cowrie
 else
-    authbind --deep twistd $DAEMONIZE $XARGS -l log/cowrie.log --umask 0077 --pidfile ${PIDFILE} cowrie
+    authbind --deep twistd $DAEMONIZE $XARGS -l log/cowrie.log --umask 0027 --pidfile ${PIDFILE} cowrie
 fi
■8. Cowrieの再起動
$ pwd
/home/cowrie
$ ./bin/cowrie stop
$ ./bin/cowrie start
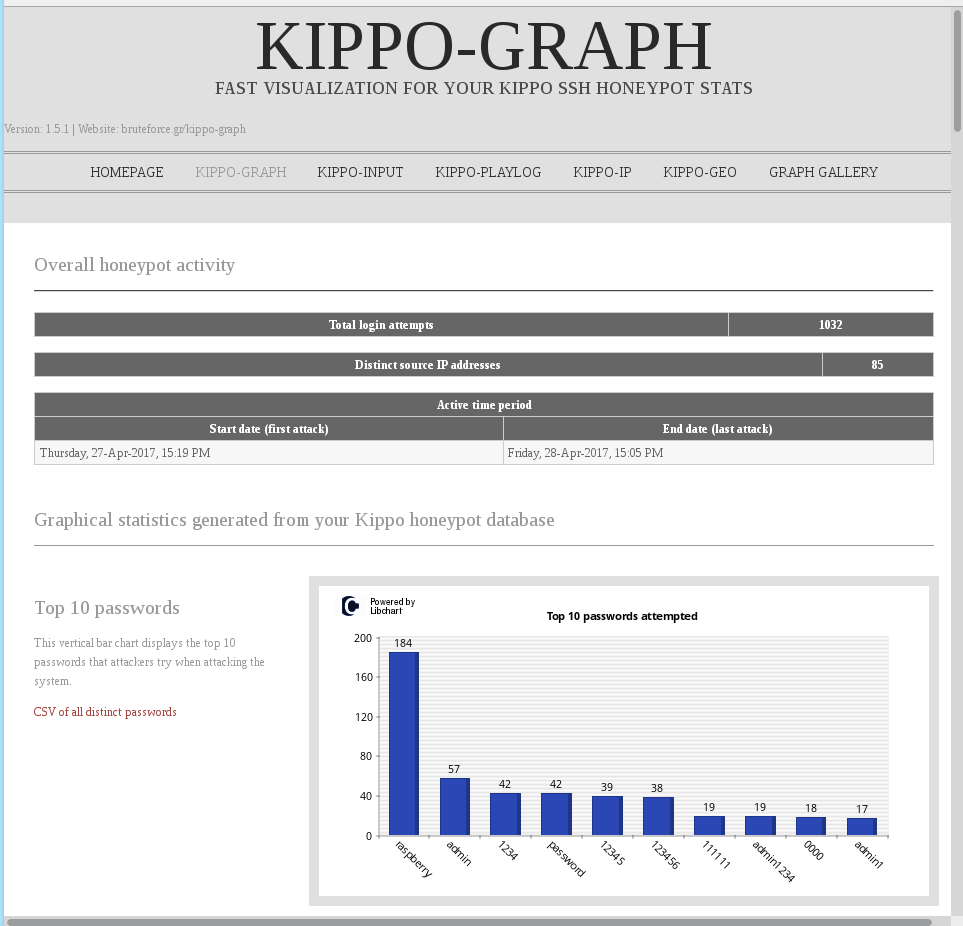
以上で Cowrie と Kippo-Graph の導入は完了
こんな感じの画面が表示される。
参考サイト
ハニーポットCowrieをCentOS7に入れてみた。
ハニーポットCowrieのログをMySQLに突っ込んでKippo-Graphで可視化した話